
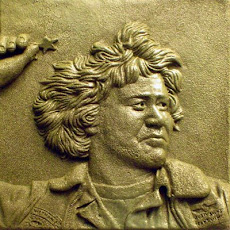
Detail of finished tile installed.

The finished product.

The original design was made in Adobe Illustrator. The square can be rotated in any direction and the design will line up. Using a computer made the exploration of tessellation much faster.

The design was printed and transferred with charcoal onto plywood. After going over the lines with a marker, each line was cut out with a scroll saw.

Slabs of clay were added to cutouts in different thicknesses. By passing the edge of the wooden puzzle pieces along a custom 90 degree wire-cutter, the excess clay was removed from the edges. Pieces then fit back together with the different layers of the design roughed out.

The clay is then sculpted in relief.

My shoe is exactly one foot long for scale. Because of the size of the design it is divided into 4 tiles that make up the complete pattern.
At this point plaster molds were made and about 30 copies of each tile were made.

The tiles laid out in the grass of my backyard.

Notes on installation. The tiles are mounted on panels that hang on french cleats so the installation is removable.


3 comments:
Write more, thats all I have to say. Literally, it seems as though you relied on the video to make your point. You definitely know what youre talking about, why throw away your intelligence on just posting videos to your blog when you could be giving us something enlightening to read?Contact flooring london
It was a very good post indeed. I thoroughly enjoyed reading it in my lunch time. Will surely come and visit this blog more often. Thanks for sharing. best fertility center in Hyderabad
I love how you used a computer to explore tessellation and then brought it into reality with clay.
Post a Comment